Who Picks Up the Trash? Lesson Plan
What We Are Learning
Social Studies Focus:
Earth Day
Theme Vocabulary:
trash, community, sanitation, gear, vest, gloves, boots
Skills We’re Practicing:
group discussion, critical thinking, vocabulary, letter recognition
- Gifts from the Garbage Truck: A True Story About the Things We (Don’t) Throw Away by Andrew Larsen tells the story of former New York City sanitation worker Nelson Molina. Molina turned trash into treasure by finding ways to revive the things that people threw away. After reading, ask children why it helps Earth to recycle or fix things that are broken.
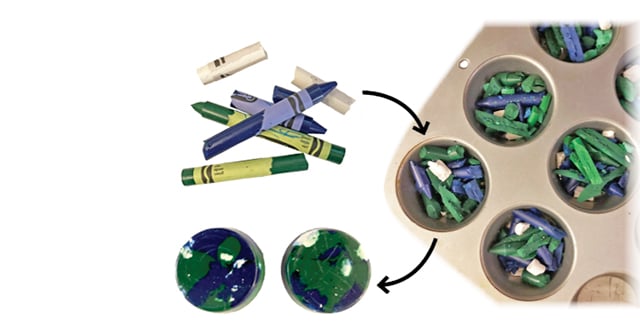
Materials: used crayons (white, blue, and green, if you want the crayons to look like mini Earths), oven or microwave, muffin tin or microwavable (silicone) muffin pan, refrigerator
- Give your old crayons new life!
- First, soak old crayons in warm water for a few minutes. Have children help remove the wrappers and place crayons on a paper towel to dry.
- Arrange crayons in the cups of the muffin tin. If you’d like to make mini Earths, start with pieces of white, then add blue and green.
- Then melt the crayons. If you’re using an oven, bake at 250º for 15-20 minutes, or until the crayons are melted. If you’re using a microwave, temperatures will vary, so check crayons every 2 minutes until they are melted.
- When crayons are melted, remove the muffin tin and allow to cool for 15 minutes. Then place the tin into the refrigerator for 30 minutes.
- Turn the tin upside down, give it a tap, and your crayons will pop out! fine-motor skills/art
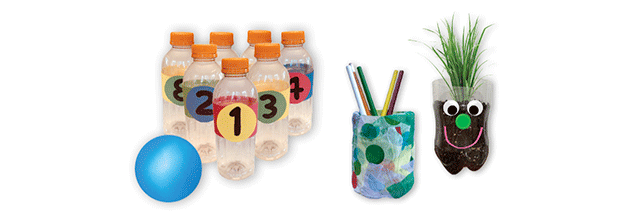
Materials: empty, rinsed plastic bottles (2-liter or 8-, 12-, or 16.9-ounce); box cutter; decorative materials (e.g., construction paper, tissue paper, magazines, decorative tape, googly eyes, paint, stickers); white glue; scissors; paintbrushes; ball
- Plastic bottles can be reused in so many ways! Here are few ideas to try with your class:
- Make a planter: Cut a 2-liter bottle below the neck, and have children decorate it. Pierce drainage holes in the bottom, fill with soil, and plant seeds!
- Make bowling pins: Cut 10 bands of paper to wrap around 12- or 16.9-ounce bottles. Decorate bands, and attach to bottles. Help children set up the “pins,” and take turns knocking them down with a ball.
- Make crayon/pencil holders: Cut 8- or 12-ounce bottles below the neck. Then decorate using decoupage! Mix three parts white glue with one part water. Have children paint the glue mixture on the bottles, and attach ripped magazines or tissue paper to the bottles. (They can also decorate with other materials.) You can use the crayon and pencil holders in the class! recycling/fine-motor skills/art